PUNCTURE, EMERGENCY SPARE WHEEL
In case of puncture
Depending on the vehicle, a tyre inflation kit or emergency spare wheel is provided (refer to the following pages).
Special note
The Tyre Pressure Monitor function does not check the emergency spare wheel (the wheel replaced by the emergency spare wheel disappears from the instrument panel display).
Refer to the information on the “Tyre pressure monitoring system” in Section 2.
If the vehicle is parked on the hard shoulder, you must warn other road users of your vehicle’s presence with a warning triangle or with other devices as per the legislation applying to the country you are in.
If the emergency spare wheel has been stored for several years, have it checked by your Dealer to ensure that it is safe to use.
Vehicles fitted with an emergency spare wheel smaller than the four other wheels:
- Never fit more than one emergency spare wheel to the same vehicle.
- As the punctured wheel is wider than the emergency spare wheel, the vehicle’s ground clearance is reduced.
- Replace the emergency spare wheel as soon as possible with a wheel with the same dimensions as the original.
- When this is fitted to the vehicle, which must only be a temporary measure, the driving speed must not exceed the speed indicated on the label on the wheel.
- Fitting an emergency spare wheel may alter the way the vehicle usually runs. Avoid sudden acceleration or deceleration and reduce your speed when cornering.
- If you need to use snow chains, fit the emergency spare wheel to the rear axle and check the tyre pressure.
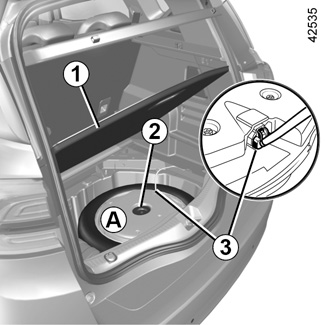
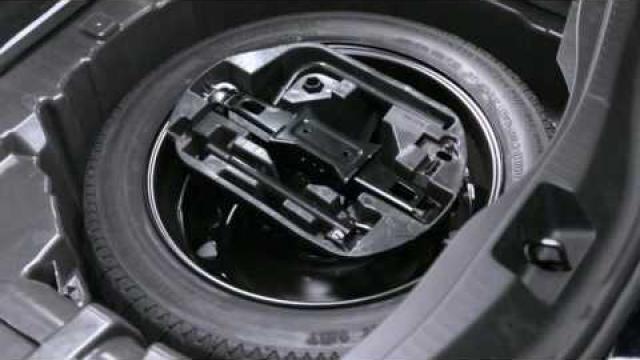
Emergency spare wheel A
This is located in the luggage compartment:
- open the tailgate;
- depending on the vehicle, lift up the movable floor and the boot mat 1;
- unscrew central mounting 2;
- for vehicles which are fitted with it, disconnect the connector 3 located under the luggage compartment carpet then remove the audio amplifier. Do not plug in the audio amplifier again without the emergency spare wheel;
- remove the emergency spare wheel;
- store the punctured wheel in the storage bag (refer to the information on “Tools” in section 5) and place it in the luggage compartment.
Emergency spare wheel C
It is located under the vehicle.
From the boot:
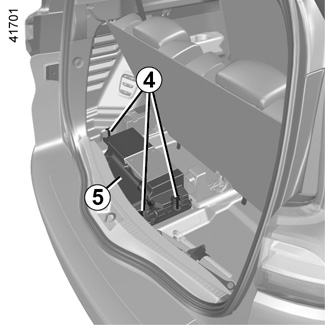
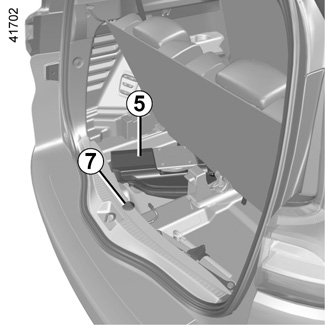
- for vehicles fitted with a servo 5, unscrew the three mounting bolts 4 then move the servo to access the cover 7;
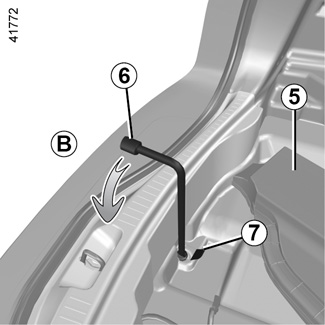
- lift cover 7;
- remove blanking cover;
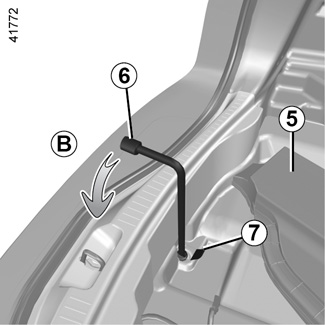
- only use the wheel brace 6 (using a different tool could damage the mechanism) to unroll the retaining cable. Unscrew the nut anticlockwise (movement B), and the wheel will lower to the ground.
Do not touch the exhaust system.
Risk of burns.

From the exterior of the vehicle, stand the wheel up, pass the cable and the component 8 through the wheel rim and release the wheel.
To put the spare wheel back C
To carry out this operation, the cable must be unwound.
Stand the wheel up with the valve towards you. Thread the cable and the component 8 through the wheel rim. Lie the wheel down with the valve towards the ground.

From the luggage compartment, tighten the nut fully clockwise (the opposite of movement B) in order to wind up the retaining cable, ensuring that the wheel remains horizontal and the cable taut.
Reposition the blanking cover then the cover 7.
For vehicles fitted with a servo, replace the servo 5. Tighten the three screws 4.
As the punctured wheel is wider than the emergency spare wheel, when you place the punctured wheel in the emergency spare wheel bay, the vehicle’s ground clearance is reduced. To prevent damage, proceed carefully when driving over raised sections of road and when dismounting pavements When this is fitted to the vehicle, which must only be a temporary measure, the driving speed must not exceed the speed indicated on the label on the wheel. Replace the emergency spare wheel as soon as possible with a wheel with the same dimensions as the original.
Emergency spare wheel D
It is located in a wheel carrier underneath the vehicle.
From the boot:
- for vehicles fitted with a servo 5, unscrew the three mounting bolts 4 then move the servo to access the cover 7;
- lift cover 7;
- remove blanking cover;
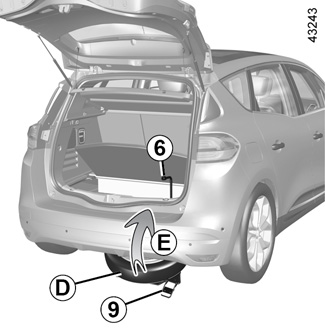
- only use the wheel brace 6 (using a different tool could damage the mechanism) to unlock and lower the wheel carrier D. Unscrew the nut anticlockwise (movement B) - the wheel carrier drops;
- under the vehicle, lift then push (movement E) the handle 9 to lower the wheel carrier on the ground;
- pull the wheel D towards you, a plastic guide located under the wheel makes it easy to move;
- remove the plastic guide from the wheel before fitting it to the vehicle.
To refit the wheel carrier:
- use the wheelbrace 6 to screw fully the nut clockwise (reverse movement B);
- make sure you lock the wheel carrier in place;
- refit the blanking cover, then the cover 7.
Make sure that the wheel carrier is always locked, with or without the emergency spare wheel inside.
There is a risk of accidents.
When the emergency spare wheel is located underneath the vehicle, it is vital to take the emergency spare wheel out before lifting the vehicle.
Risk of injury.