Charging
Charging
Charging schematic diagram
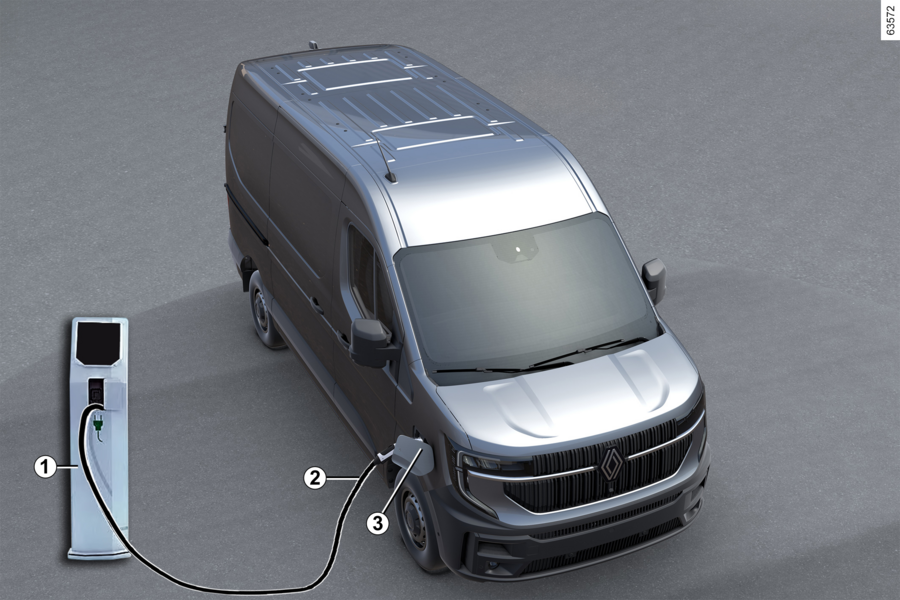
- 1
- Specific wall socket or recharging terminal
- 2
- Charging cable
- 3
- Electric charging connection (passenger side)
Tip
If you have any questions regarding the equipment needed for charging, please ask
an authorised dealer.
Important recommendations for charging your vehicle
WARNING
Please read these instructions carefully. Failure to follow these instructions may
lead to a risk of fire, serious injury or electric shocks which could result in death.
Charging
Do not do anything to the vehicle during charging (washing, working in the engine
compartment, etc.).
In the event of the presence of water, signs of corrosion or foreign bodies in the
charging cord connector or in the vehicle charging socket, do not charge the vehicle.
Fire hazard.
Do not attempt to touch the cord contacts, the domestic socket or the vehicle charging
socket, or introduce objects into them.
Never plug the charging cord into an adapter, multiple socket or extension lead.
The use of generators is prohibited.
Do not remove or change the vehicle charging socket or the charging cord. Fire hazard.
Do not modify or perform any action on the installation during charging.
In the event of an impact, even slight, against the charging flap or valve, have them
checked by an authorised dealer as soon as possible.
Take care of the lead: do not tread on it, immerse it in water, pull on it or let
anything knock against it.
Check regularly that the charging lead is in good condition.
In the event of damage to the charging lead (corrosion, browning, cuts, etc.), to
the unit or to the vehicle's electrical charging socket, do not use them. Please see
an authorised dealer to replace them.
In the event of non-activation of the charging flap locking mechanism and/or unlocking
of the vehicle's electric charging socket, please contact an approved dealer.
Charging lead A

This lead is specific to your vehicle and designed for connecting to wall sockets
or public terminals to enable standard charging of the traction battery.
Tip
We recommend that you use a charging cord that enables a standard charge to charge
the traction battery.
Tip
Before cleaning the charging lead, make sure the lead is disconnected.
Clean the cable using a cloth slightly dampened with water.
When cleaning, make sure that the cloth does not come into contact with the ends of
the cable (connectors, charging pins) to avoid any risk of corrosion.
Charging lead B
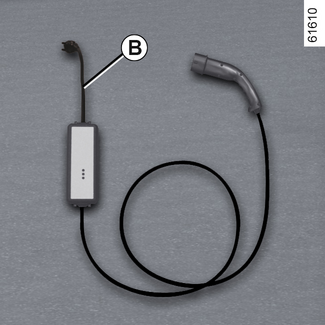
This lead can be used for:
- in normal use, on a socket used only for the vehicle (14 A/16 A charging);
- occasional charge using a domestic socket, (8 A charge) when you are not at home, for example.
In all cases, sockets must be fitted as stated in the instructions provided with the
charging lead B.

In all cases, read the charging lead B user instructions carefully.
Tip
Never leave the socket hanging by the cord. Use the hooks C to hang it.
Tip
If a malfunction occurs during the charging process (red warning light appears on
the unit D), stop charging immediately. Please refer to cord instructions.
Important recommendations for charging your vehicle
WARNING
Important recommendations for charging your vehicle
Please read these instructions carefully. Failure to follow these instructions may
lead to a risk of fire, serious injury or electric shocks which could result in death.
Choice of charging cord
The standard charging cords supplied with the vehicle have been designed specifically
for this vehicle. It is designed to protect you against the risks of electric shock
that can lead to death or fire.
Do not use with the charging leads of previous vehicles as they are not adapted.
For safety reasons, the use of a charging cord not recommended by the manufacturer
is strictly forbidden. Failure to follow this instruction can lead to risks of fire
or electric shock that can prove fatal. For information on a charging cord suited
to your vehicle, please consult an authorised dealer.
Using the charging lead B
Please read the instructions that come with the charging lead carefully to learn about
the precautions you must take when using the product and the technical specifications
required for fitting the socket.
Installation
Wall socket
Have a special wall socket installed by a qualified professional.
In the case of domestic charging
Have a qualified professional check that each socket to which you will connect the
charging cable complies with the standards and regulations in force in your country
and that it complies with the specifications described in the information on "Power
supply systems".
Power supply systems
Only use charging terminals which conform to the IEC 61851-1 standard and connecting
points protected by:
- a Type A 30 mA residual current device specific to the socket used;
- an overcurrent protection device;
- protection against overvoltage relating to lightning in exposed areas (IEC 62305-4);
- an earth connection that complies with the standards in the relevant country.
Charging types that conform to European standards
Alternating current (AC)


If the information is displayed on the vehicle charging flap, follow the instructions
below.
Before plugging in a charging lead, check that:
- the colour and one of the letters of the input socket 1 correspond to the colour and one of the letters on the end 4 of the lead;
- the colour and one of the letters of the input socket 3 correspond to the colour and one of the letters on the end 5 of the lead.
Labels
Charging type | Alternating current (AC) | |||
Connection | Charging terminal 1/Charging cable 4 | Vehicle 3/Charging cable 5 | ||
Charging types that conform to European standards (for all other cases, please consult an approved dealer).
|  |  |  |  |
Direct current (DC)

If the information is displayed on the vehicle charging flap, follow the instructions
below.
Before plugging in a charging lead, make sure that the colour and one of the letters
on the inlet socket 3 correspond to the colour and one of the letters on the end 5 of the charging lead.
Labels
Charging type | Direct current (DC) | ||||
Connection | Vehicle 3/Charging lead5 | ||||
Charging types that conform to European standards (for all other cases, please consult an approved dealer).
|  |  |  |  |  |
Electric charging socket 3

Note: if in a snowy environment, remove snow from the vehicle charging area on the passenger
side before plugging in or disconnecting.
Snow in the socket may block the insertion of the charging cord plug.
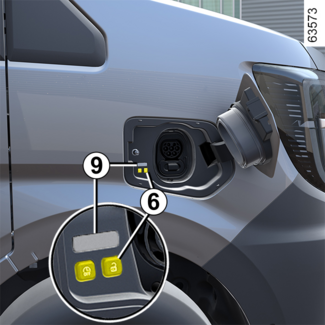
The vehicle is equipped with two charging connections located on the passenger side
at the front of the vehicle:
- socket E for charging up to 22 kW;
- socket F for rapid charging (depending on the vehicle).
There are also one or two buttons (depending on the vehicle) located inside the charging
flap:
- the button 6
unlocks the charging cable;
- depending on the vehicle, the button 7
can be used to activate immediate charging of the vehicle.
Precautions
For daily use, it is recommended that you charge your vehicle to 80% to improve the
CHARGING PROGRAMMING battery service life.
Avoid charging and parking your vehicle in extreme temperatures (hot or cold).
Under extreme conditions, charging may take several minutes before starting (time
required for the traction battery to cool down or warm up).
When the vehicle is parked for more than seven days in temperatures below approximately
-25°C, charging the traction battery can become impossible.
When the vehicle is parked for more than three months with near zero charge, charging
the battery can become impossible.
The energy level available depends on the battery temperature. It may therefore vary
between stopping and restarting the vehicle if the battery is cold or warm.
To preserve the service life of your traction battery, avoid parking the vehicle for
more than one month with high charge, especially when the weather is very hot.
Favour charging the traction battery after driving and/or in mild temperatures. Otherwise,
charging may take a longer period of time or even become impossible.
It is preferable to recharge the vehicle after driving if the charge level is low
(< 25%) and in negative temperatures.
Advice
- In high temperatures, try to park and recharge the vehicle in a shaded/sheltered location;
- charging can be performed in the rain or snow;
- activating the air-conditioning increases the charging time required.
Recharging the traction battery

Vehicle stationary, ignition off:
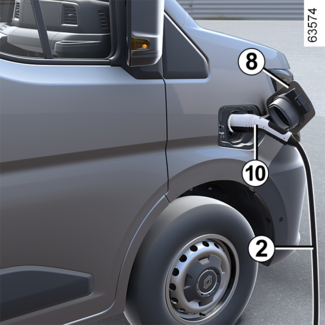
- take the charging cable 2 located in the storage compartment in your vehicle's luggage compartment;
- press the charging flap 8 to unlock it. The warning light 9 illuminates in white;
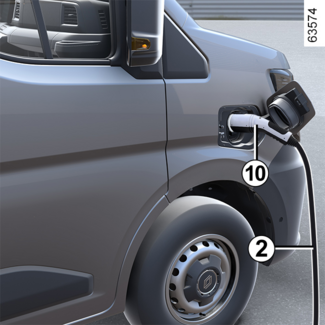
- plug in the end of the lead to the power supply;
- grab the handle 10;
- plug in the vehicle cord. The warning light 9 flashes in white;
Tip
Do not use the charging flap 8 to hang the charging lead 2 while recharging the vehicle.
Tip
If you have just accepted a system update via the multimedia system, the traction
battery charging will be delayed or cancelled.
Wait for the update to be completed before connecting the charging lead to the vehicle.
For more information on system updates, please refer to the multimedia instructions.
- after you hear a locking click, check that the charging cord is properly plugged in. To check the locking, pull gently on the handle 10;
- depending on the vehicle, if you have programmed deferred charging and you wish to start charging immediately, press the button 7 to start charging.
The charging cord is automatically locked with the vehicle. This will make it impossible
to unplug the cord from your vehicle.
Tip
If fast-charging the vehicle (DC), the charging cable between your vehicle and the charging terminal must not exceed
30 metres.
If in doubt about the length of the cable, consult the owner of the charging terminal
(DC).
Tip
Make sure you fully uncoil the charging cord to limit its heating.
WARNING
Do not use an extension lead, multiple socket or adapter.
Fire hazard.

During charging, the warning light 9 flashes in blue.
When charging starts, the following information is displayed on the instrument panel:
- the energy level on the battery warning light 12;
Tip
The traction battery charging time depends on the amount of energy remaining and the
power delivered by the charging terminal. The information is displayed on the instrument
panel during charging DISPLAYS AND INDICATORS.
Note: under certain conditions, the actual charging time may be longer than the charging
time displayed on the instrument panel. This depends on:
- the quality of the electrical network;
- the initial charge level;
- the exterior temperature is too cold;
- ...
In the event of a problem with the charging cable, we recommend that you replace it
with a cable that is identical to the original. Consult an approved Dealer.

- the battery refill rate;
- an estimate of the remaining charging time (this is not displayed after the battery is charged to approximately 95%);
- the
warning light to indicate that the vehicle is connected to a power supply;
- your vehicle range will vary according to the charge level.
The display on the instrument panel disappears after a few seconds. It reappears on
the instrument panel when a door is opened.
One charging is complete, the warning light 9 illuminates continuously in green.
You do not need to wait until the charge is at reserve levels to recharge your vehicle.
Operating faults
If the warning light 9 is illuminated continuously in red, please contact an approved dealer.
Precautions to take when removing from the socket
- Press the button 6 or press and hold the door unlocking button on the key in order to release the vehicle charging cable;
- grab the handle 10;
Tip
It is imperative to follow the unplugging steps in order.
- unplug the charging lead 2 from the vehicle;
- you must close the charging flap 8 and press on it to lock it;
- disconnect the lead 2 from the power supply 1;
- store the cable 2.
Note: immediately after a long period of charging the traction battery, the lead may be
hot. Please use the handles.
Tip
After pressing the charging cable release button, you will have around 30 seconds
to unplug it before it is locked once again.
Label 12

The label 12 located on the charging flap 8 provides information on the charging operation according to the status of the warning
light 9:
- when it flashes in white this indicates that the lead is plugged into the vehicle and the system is carrying out its checks;
- when it flashes in blue this indicates that charging is in progress;
- when it lights up continuously in blue this indicates that charging programming is activated;
- when it lights up continuously in green this indicates that the vehicle is fully charged;
- when it lights up continuously in red this indicates an operating fault.
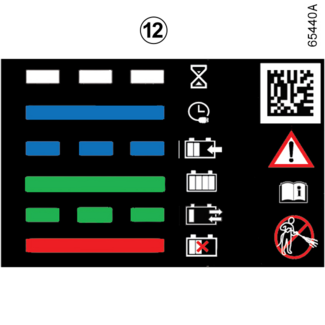
The label 12 located on the right-hand side reminds you of the following instructions:
- do not wash the charging flap using a high-pressure water jet;
- with the vehicle stationary, the valve and the charging flap can be opened;
- when the vehicle is being driven, the valve and the charging flap must be closed;
- open the flap to connect the charging lead;
- close the flap again once disconnected;
- connect to a domestic socket, an alternating current charging terminal or a quick charging terminal;
- for any information on charging, please consult your vehicle user manual.
