ENTERING A DESTINATION
| “Navigation” menu | |
From the main menu, press “Navigation”. From the “Navigation” menu, press the button “Drive to...” to enter your destination. | ||
| “Drive to...” menu | |
This menu offers several ways to enter a destination: - enter an address from the “Locations” section using one of the following methods: - enter a full address (town/city, street and number); - search by postcode; - Select a City Centre, - select a crossing or junction; - select a “Home”; - select an address from the “Saved locations”; | ||


- select a destination from the “Recent destinations”; - select a destination by “Charging station” (electric vehicle); - select an address from a “Point of interest” (POI); - select a “Point on map”; - select a “Latitude” and a “Longitude”. | ||
| “Home” | |
This menu can be used to start navigating your way home. To store the address of your home location, use “Settings” menu, then “Change home location”. | ||

| “Saved locations” | |
The “Saved locations” section contains the favourite stored destinations such as your place of work, etc. - Select the “Navigation” section from the “Drive to...” menu; - Choose “Saved locations” and confirm; - Select the required destination address in the list of stored addresses to start guidance. You can manage your saved addresses within the “Settings” menu; select “Manage saved locations”. Note: the “Saved locations” icon is for accessing stored addresses and the “+” button is for adding addresses as required. | ||

For safety reasons, carry out these operations when the vehicle is stationary.

| Enter an “Locations” | |
This section enables you to enter a full or partial address: country, town, street and number. On first use, the system asks you to choose the destination country. Depending on the various version, you can enter the name of the desired town or its postcode using the keypad 3. The system may suggest several town names in the area 1. - Press on the name of the town/city displayed to confirm; - access the full list of matches for your search by selecting “List” 2; - select the town or city; - follow the same procedure for the “street” and “house” fields. | ||

Note: The system will store the last towns/cities entered in its memory. You may directly select one of these towns by pressing the 1 zone.
Note: only addresses known to the system through the digital map are authorised.
| “Recent destinations” | |
This item enables you to select a destination from the list of addresses last used. These are automatically stored. - Select the “Drive to...” section from the “Navigation” menu, then choose “Recent destinations”; - from the list of stored destinations, select an address to begin guidance. | ||

For safety reasons, carry out these operations when the vehicle is stationary.
| “Charging station” | |
This menu enables you to find a charging station for your electric vehicle and to plan your route to this location. Note: You can manage your personal stations via the “EV settings” menu. For further information, please refer to the section on ‘’Navigation settings”. Note: Personal recharging stations are stored in the navigation system, whereas the generic list of recharging stations is stored on the SD card. Only the list on the map SD can be updated and only the personal recharging stations can be managed from the navigation system. | ||

| “Point of interest” (POI) | |
A point of interest (POI) is a service, establishment or even a tourist area close to a location (start point, destination city, en route, etc.). POIs are classed in different categories, e.g. restaurants, museums, car parks, etc. There are several options to find a point of interest: - category; - the name of the desired POI. Select the “Drive to...” section from the Navigation menu, then “Point of interest” and confirm. | ||

Search by POI category - Select the “Drive to...” section from the “Navigation” menu, then choose “Point of interest”; - Select the search area: “Near my location”, “In city” or “Near Home”; - select your desired category type; - select the desired POI from the list suggested, then press the “Select” button on the multimedia system screen to begin navigation to this location. Search by POI name Enter the name of a POI you want to find. The system will start the search automatically. |
| “Point on map” | |
This function allows you to define a destination from the map. From the “Navigation” menu, select “Drive to...”, then “Point on map”. Move around the map to position the cursor on your destination, then confirm: the system calculates the route. | ||
| “Latitude Longitude” | |
This function allows you to define a destination using latitude and longitude values. | ||


Confirming the destination
Once the destination information has been entered, the system displays a route summary for confirmation. Once you have confirmed the route, the system will calculate the itinerary. By default, the calculation is done by selecting the fastest route.
Note: The calculation criterion can be changed in the settings.
At the end of the calculation, the system displays the navigation summary and suggests two options:
- “+” enables you to view the route details in various forms. For more information, refer to the information on “Route details” in the “Guidance” section, change the route and save the route.
- “Done” activates guidance.
Note: if you do not confirm, this page will close after ten seconds and guidance will start automatically.
Note: depending on the vehicle charge level, if you can reach your destination, guidance is launched - if the charge level is too low, the system offers to search for a recharging terminal on the way.
Note: “ IQ Routes™” is a function which optimises the journey time using statistical data and calculates routes based on the average traffic levels on that day and time. To activate or deactivate this function, refer to the “Navigation settings” section.
Latest map guarantee
After delivery of your new vehicle you have about 60 days in which to update the map free of charge.
Once this time has elapsed, you will need to pay for updates.
For more information, please see an Authorised Dealer.
For safety reasons, carry out these operations when the vehicle is stationary.
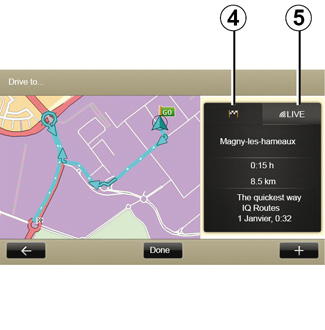
Summary of selected route
The summary is displayed after calculation of the route and the selection of a destination.
The screen has two tabs:
- the “journey” tab 4 allows a summary of your route to be displayed;
- The “Live” 5 tab displays traffic information in real time (subject to subscription).
Note: press one of the tabs to view its content.
Note: the source of the traffic information received is automatically selected by the multimedia system (LIVE if you have taken out a subscription).
Specific features for electric vehicles
The map shows the part of the journey that can be completed in green, and the part of the journey that cannot be completed without recharging in red.
If your vehicle charge level is high enough, a chequered flag is displayed in the journey tab 4.
If your vehicle charge level is too low, a chequered flag with a lightning symbol on a red background is displayed in the journey tab 4.